Create a WordPress Coming Soon Page
Not everyone gets the appeal of creating a coming soon page and it might seem like a waste of time to some people. However, having a coming soon page can be an effective marketing strategy. It also becomes a lot easier and quicker to create a basic and yet stylish coming soon page if you are using WordPress.
In this post, we will give you some tips on how to get the most value out of a WordPress coming soon page. You will also learn how to create a WordPress coming soon page for your own website.
Table of Contents
Tips for Creating a Coming Soon Page
One of the first things to remember when creating a coming soon page is to actually provide some value to users. Just placing a big coming soon text with a background image can work for well-established companies but you will need to put some effort into it if you are just starting out.
Show a Launch Date
A basic piece of information that you can provide to users is to give them a launch date for the product or service. This way even if someone visits your coming soon page only once, they would still know when you are planning to go live.
Use Social Media for Updates
Provide links to any social media accounts that you have created. People who are actually interested in your product or service will likely have some questions or would like to stay updated. Sharing your social media accounts will help you get some early likes and followers as well as give users an easy way of contacting you. You can also use the coming soon page as an opportunity to build an email list.
Build Hype with Previews and Updates
You can also provide timely updates on the coming soon page about the progress that you have been making with your product or service. This will help build some hype around the product and keep your followers engaged.
Create a WordPress Coming Soon Page
We will be using a free WordPress plugin called CMP—Coming Soon and Maintainance Plugin to create our WordPress coming soon page. It is completely free and easy to use.

Once you have installed and activated the plugin, you can turn on the Coming Soon Mode from the Admin toolbar in the dashboard.
Since “Coming Soon Mode” is turned on, you might expect that visiting the homepage of your website directly in a new tab will show you a coming soon page but that’s not how it works. All the content of the website will still be accessible to you as an Admin. However, other visitors will see a generic message when they try to visit any page on the website. Here is a screenshot of the generic coming soon page that the plugin creates by default as soon as you turn the coming soon mode On.
Choosing a Theme
The plugin comes with three free themes that have some basic features built into them. All of them offer a slightly different set of features. We will choose the Countdown theme in this step because it offers a bunch of features like an actual countdown timer, a subscription form and the ability to link to social media profiles.
Adding Content to the Page
We will be adding two main pieces of content to our coming soon page. First is the logo to help establish our brand identity and second is a lunch date with the progress that we have made so far.
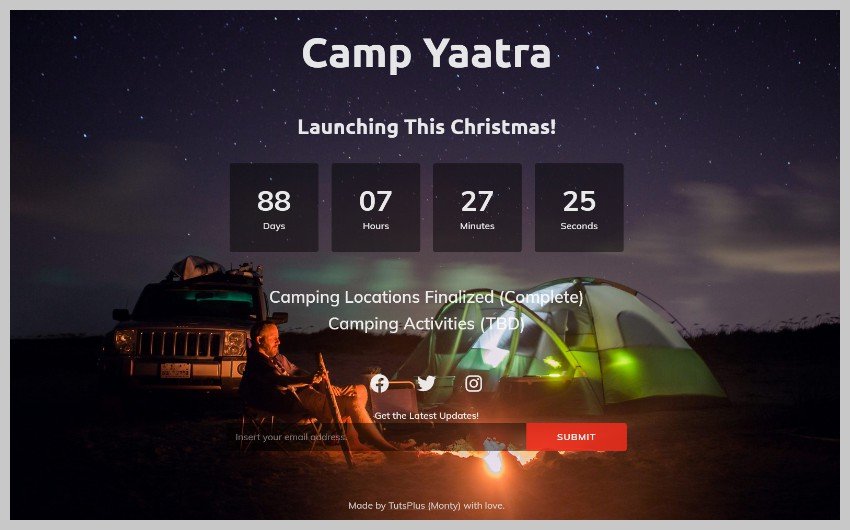
For this tutorial, our coming soon page will refer to a fictitious service called “Camp Yaatra” that helps people plan camping trips. Therefore, the logo is simply the text Camp Yaatra in a large font. It links to the homepage of the website.
The main content simply announces the launch date and provides a basic update about the tasks we have completed so far and tasks that are to be done. We are writing it as HTML (after using the Text tab) here because we will be using some custom CSS to modify the appearance of our to-do list.
Since we are launching the service on Christmas, it makes sense to set the countdown timer to December 25, 2021. You can also instruct the plugin to take some predefined actions like hiding the counter when the time is up. We have set it to disable the coming soon page.
There are three different options to create a mailing list with the plugin. You can use the built-in subscription form provided by CMP or use MailOption or any other 3rd party plugin by including their shortcode.
Assuming you have followed all the steps in the tutorial so far, your coming soon page should look similar to the image below. The font and placement of some items might be a bit off but we will get to that in the next section.
Customizing the Font and Appearance
The color and font of the coming soon page can be customized from the Customize tab in the plugin settings. You will be able to specify the font family, font weight as well as the letter spacing and line height for the heading and main content.
The dropdown menu allows you to choose from a big list of Google fonts. I have selected Ubuntu for the heading and Muli as content font in our example.
Now, we move on to the Custom CSS tab and enter the following custom CSS.
p.progress {
font-size: 2rem;
margin: 0;
}
div.logo-wrapper {
padding-top: 0;
}
h1.cmp-title {
margin-top: 0;
}
.cmp-subscribe input[type=”email”] {
font-style: normal;
}
.social-wrapper.body {
margin-bottom: 0;
}
#subscribe-form {
margin: 0;
}
Adding Social Media Icons and Footer Content
You can use this plugin to add links of different social media platforms where you actively engage with your followers. We will be including just Facebook, Twitter and Instagram here but you can add your YouTube channel or TikTok account as well.
The footer content can be the tagline of your company or provide some more information about it like its physical location etc.
Adding a Background
You can also add your own custom background to the coming soon page. This could either be the default image that is unique for each theme or it could be a custom image that you have uploaded to WordPress media library. The plugin also gives you the option to use a video as background or show a random image from Unsplash.
Other options include settings a simple gradient or solid color as background. You can also use a solid color or background as an overlay over your own custom image if you like. In our example, we have used a camping image from reshot. Here is what the final version of our Coming Soon page looks like.
Final Thoughts
In this tutorial, we have used a free plugin to quickly create our own customized WordPress Coming Soon page. Hopefully, the end result looks good enough for use in your own projects. Try experimenting with different themes and adding your own custom content and CSS to make it stand out even more.
You can also take a look at lot of other such free plugins listed in the WordPress directory if you would like to try them out.